
生成式对抗网络(GAN)
生成式对抗网络(GAN, Generative Adversarial Networks )是一种深度学习模型,是近年来复杂分布上无监督学习最具前景的方法之一。模型通过框架中(至少)两个模块:生成模型(Generative Model)和判别模型(Discriminative Model)的互相博弈学习产生相当好的输出。原始 GAN 理论中,并不要求 G 和 D 都是神经网络,只需要是能拟合相应生成和判别的函数即可。但实用中一般均使用深度神经网络作为 G 和 D 。一个优秀的GAN应用需要有良好的训练方法,否则可能由于神经网络模型的自由性而导致输出不理想。
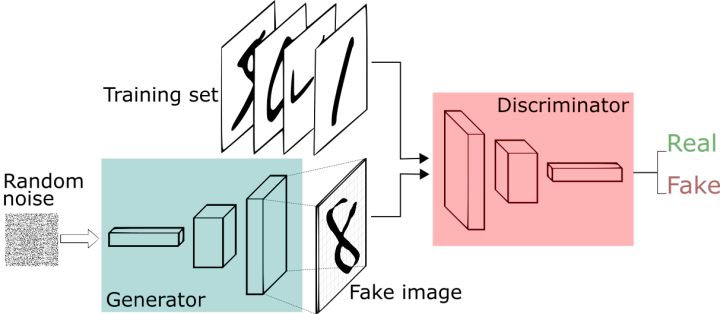
简单来说,GAN由俩个模块组成,生成模型以及判别模型,生成器将生成假的图片,并欺骗判别器让它误以为真。而判别器则会筛选生成器生成的图片,从中检测真伪。这个有趣的对抗概念是由Ian Goodfellow在2014年提出的。已经有很多学习GAN的资源,因此,为了避免重复,我将不再解释GAN。
StyleGAN(2.0)
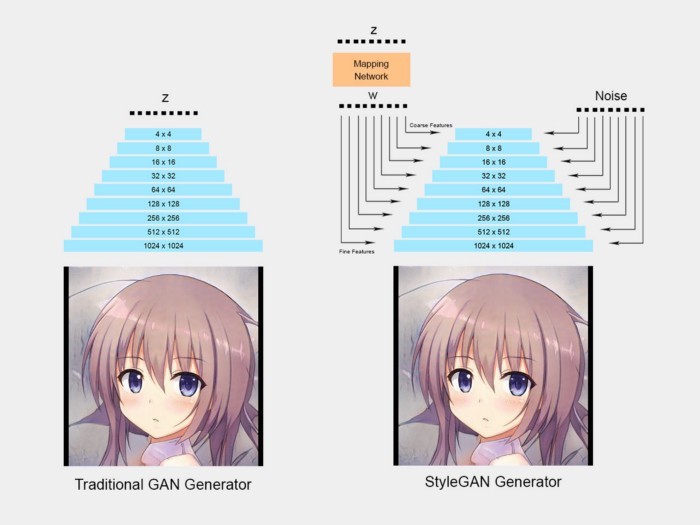
NVIDIA在2018年发布了StyleGAN论文“基于GAN样式的体系结构”。该论文提出了GAN的新生成器体系结构,该体系结构使他们可以调节粗略细节(如头部形状)或精细的细节(例如,眼睛颜色)
StyleGAN还结合了Progressive GAN的想法,该网络最初以较低的分辨率(4x4)进行网络训练,然后在稳定后逐渐添加较大的层。这样,训练时间变得更快,并且训练也更加稳定。
生成动漫人物
我将使用Aaron Gokaslan预先训练好的Anime Style2,以便我们可以立即加载模型并生成动漫面孔。因此,打开您的Jupyter笔记本或Google Colab,让我们开始编码。
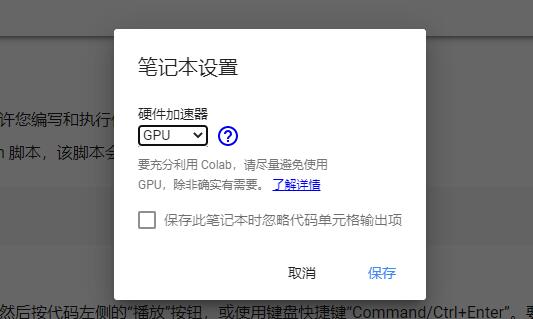
注意 : 需要科学上网,如果你不知道如何使用 COLAB ,请移步至此
首先,我们需要克隆styleGAN存储库。
$ git clone https://github.com/NVlabs/stylegan2.git
#如果你使用的是COLAB,请用 ! 代替 $
! git clone https://github.com/NVlabs/stylegan2.git
接下来,我们需要下载之前提到的,已训练完毕的模型,COLAB需要设置为GPU运行。
%tensorflow_version 1.x
import tensorflow as tf

# Make sure you use tensoflow version 1
print('Tensorflow version: {}'.format(tf.__version__) )

# Use '%' prefix in colab or run this in command line
%cd /content/stylegan2

import pretrained_networks
from google_drive_downloader import GoogleDriveDownloader as gdd

# Links to the pre-trained anime StyleGAN weights, you can copy the file to your own drive, if it's over the download limit
url = 'https://drive.google.com/open?id=1WNQELgHnaqMTq3TlrnDaVkyrAH8Zrjez'
model_id = url.replace('https://drive.google.com/open?id=', '')

network_pkl = '/content/models/model_%s.pkl' % model_id#(hashlib.md5(model_id.encode()).hexdigest())
gdd.download_file_from_google_drive(file_id=model_id,
                                    dest_path=network_pkl)

# It returns 3 networks, we will be mainly using Gs
# _G = Instantaneous snapshot of the generator. Mainly useful for resuming a previous training run.
# _D = Instantaneous snapshot of the discriminator. Mainly useful for resuming a previous training run.
# Gs = Long-term average of the generator. Yields higher-quality results than the instantaneous snapshot.
_G, _D, Gs = pretrained_networks.load_networks(network_pkl)
填入并执行以上代码,即可完成对模型的下载。
现在,我们需要生成随机向量z,以用作生成器的输入。让我们创建一个方法,以从给定的种子生成潜在代码z
import numpy as np

def generate_zs_from_seeds(seeds):
    zs = []
    for seed_idx, seed in enumerate(seeds):
        rnd = np.random.RandomState(seed)
        z = rnd.randn(1, *Gs.input_shape[1:]) # [minibatch, component]
        zs.append(z)
    return zs
最后, 我们可以创建一个方法,该方法采用生成的随机向量z并生成图像。
import dnnlib
import dnnlib.tflib as tflib
import PIL.Image
from tqdm import tqdm

# Get tf noise variables, for the stochastic variation
noise_vars = [var for name, var in Gs.components.synthesis.vars.items() if name.startswith('noise')]

# Trunctation psi value needed for the truncation trick
def generate_images(zs, truncation_psi):
    Gs_kwargs = dnnlib.EasyDict()
    Gs_kwargs.output_transform = dict(func=tflib.convert_images_to_uint8, nchw_to_nhwc=True)
    Gs_kwargs.randomize_noise = False
    if not isinstance(truncation_psi, list):
        truncation_psi = [truncation_psi] * len(zs)

    imgs = []
    for z_idx, z in tqdm(enumerate(zs)):
        Gs_kwargs.truncation_psi = truncation_psi[z_idx]
        noise_rnd = np.random.RandomState(1) # fix noise
        tflib.set_vars({var: noise_rnd.randn(*var.shape.as_list()) for var in noise_vars}) # [height, width]
        images = Gs.run(z, None, **Gs_kwargs) # [minibatch, height, width, channel]
        imgs.append(PIL.Image.fromarray(images[0], 'RGB'))

    # Return array of PIL.Image
    return imgs

def generate_images_from_seeds(seeds, truncation_psi):
    return generate_images(generate_zs_from_seeds(seeds), truncation_psi)
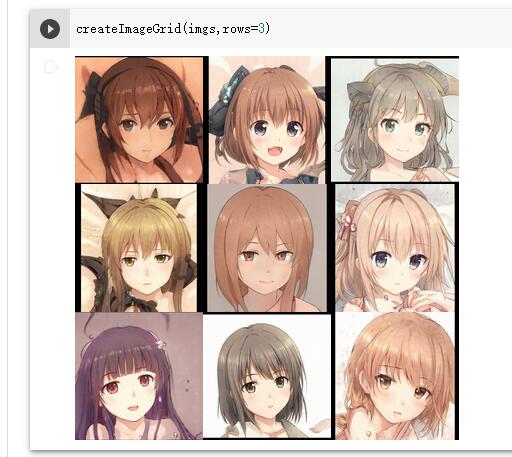
好了,接下来让我们生成一组图片尝试一下
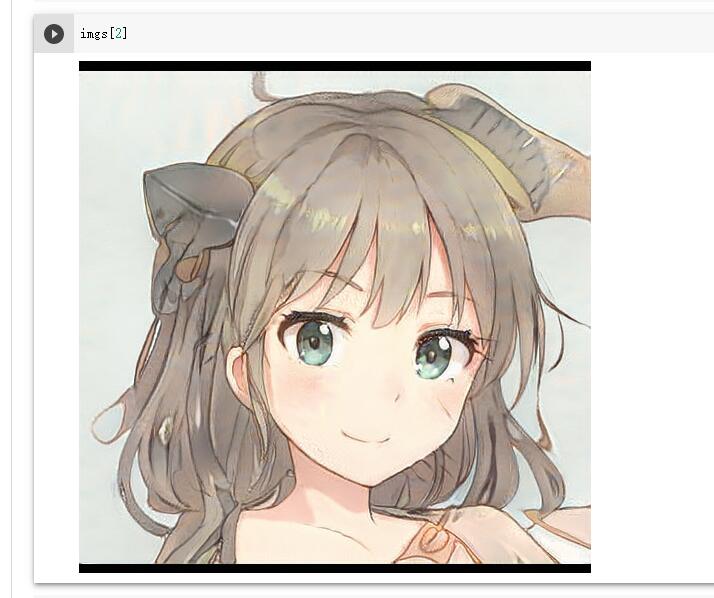
# generate 9 random seeds
seeds = np.random.randint(10000000, size=9)
print(seeds)

zs = generate_zs_from_seeds(seeds)
imgs = generate_images(zs, 0.5)
#生成了9张图片,使用下标切换显示各个图片
imgs[0]
显示一张图片太麻烦了,我们可以绘制一个九宫格来显示所有图片
from math import ceil

def createImageGrid(images, scale=0.25, rows=1):
   w,h = images[0].size
   w = int(w*scale)
   h = int(h*scale)
   height = rows*h
   cols = ceil(len(images) / rows)
   width = cols*w
   canvas = PIL.Image.new('RGBA', (width,height), 'white')
   for i,img in enumerate(images):
     img = img.resize((w,h), PIL.Image.ANTIALIAS)
     canvas.paste(img, (w*(i % cols), h*(i // cols)))
   return canvas
createImageGrid(imgs,rows=3)
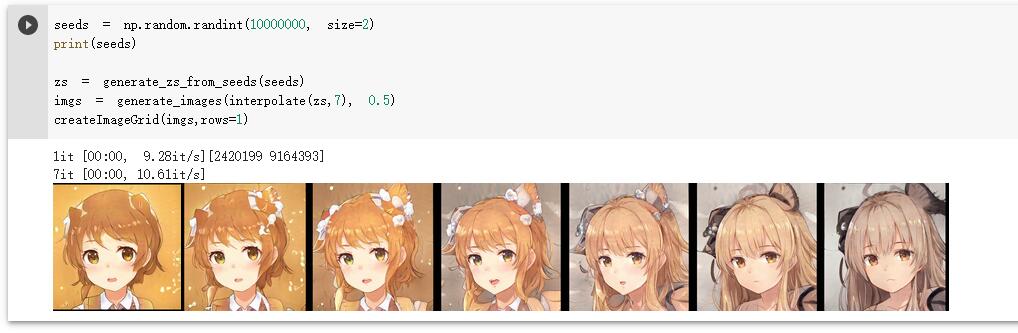
我们还可以在z向量中获取俩个点,让其进行插值计算,使我们可以查看其过渡效果
#定义方法
def interpolate(zs, steps):
   out = []
   for i in range(len(zs)-1):
    for index in range(steps):
     fraction = index/float(steps)
     out.append(zs[i+1]*fraction + zs[i]*(1-fraction))
   return out
seeds = np.random.randint(10000000, size=2)
print(seeds)

zs = generate_zs_from_seeds(seeds)
imgs = generate_images(interpolate(zs,7), 0.5)
createImageGrid(imgs,rows=1)
现在,我们已经完成了插值。我们最终可以尝试在上面的缩略图中制作GIF。我们将使用moviepy库来创建视频或GIF文件。
import scipy
import moviepy.editor

grid_size = [3,3]
duration_sec = 5
smoothing_sec = 1.0
image_zoom = 1
fps = 15
random_seed = np.random.randint(0, 999)

num_frames = int(np.rint(duration_sec * fps))
random_state = np.random.RandomState(random_seed)

# Generate latent vectors
shape = [num_frames, np.prod(grid_size)] + Gs.input_shape[1:] # [frame, image, channel, component]
all_latents = random_state.randn(*shape).astype(np.float32)
all_latents = scipy.ndimage.gaussian_filter(all_latents, [smoothing_sec * fps] + [0] * len(Gs.input_shape), mode='wrap')
all_latents /= np.sqrt(np.mean(np.square(all_latents)))


def create_image_grid(images, grid_size=None):
    assert images.ndim == 3 or images.ndim == 4
    num, img_h, img_w, channels = images.shape

    if grid_size is not None:
        grid_w, grid_h = tuple(grid_size)
    else:
        grid_w = max(int(np.ceil(np.sqrt(num))), 1)
        grid_h = max((num - 1) // grid_w + 1, 1)

    grid = np.zeros([grid_h * img_h, grid_w * img_w, channels], dtype=images.dtype)
    for idx in range(num):
        x = (idx % grid_w) * img_w
        y = (idx // grid_w) * img_h
        grid[y : y + img_h, x : x + img_w] = images[idx]
    return grid

# Frame generation func for moviepy.
def make_frame(t):
    frame_idx = int(np.clip(np.round(t * fps), 0, num_frames - 1))
    latents = all_latents[frame_idx]
    fmt = dict(func=tflib.convert_images_to_uint8, nchw_to_nhwc=True)
    images = Gs.run(latents, None, truncation_psi=0.7,
                          randomize_noise=False, output_transform=fmt,
                          minibatch_size=16)

    grid = create_image_grid(images, grid_size)
    if image_zoom > 1:
        grid = scipy.ndimage.zoom(grid, [image_zoom, image_zoom, 1], order=0)
    if grid.shape[2] == 1:
        grid = grid.repeat(3, 2) # grayscale => RGB
    return grid

# Generate video.
video_clip = moviepy.editor.VideoClip(make_frame, duration=duration_sec)

# Use this if you want to generate .mp4 video instead
# 建议使用以下代码输出MP4,GIF文件将近有100MB大小
# video_clip.write_videofile('random_grid_%s.mp4' % random_seed, fps=fps, codec='libx264', bitrate='2M')

video_clip.write_gif('random_grid_%s.gif' % random_seed, fps=fps)
当你成功运行以上代码时,一个GIF或者MP4会成功的保存到你的COLAB目录中,手动查看即可。
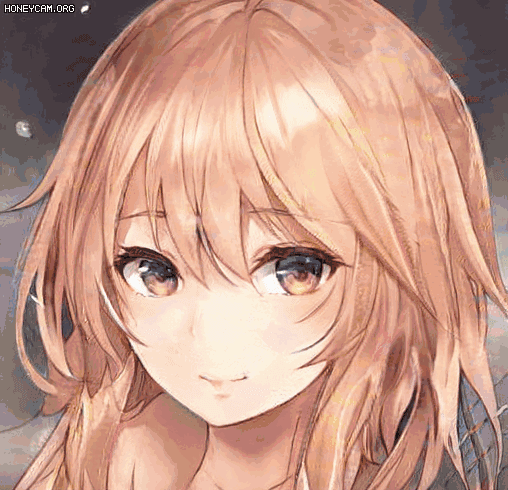
恭喜,你已经成功使用STYLEGAN2生成新的动漫图片,你可以继续尝试自己的想法,调试以上代码的所有参数。
更进一步
- 已生成的图片浏览器
- 之后你可以尝试训练自己的模型,以让机器生成不同风格的图片
- 当然,你也可以在GITHUB上寻找其他的数据集(模型)
- 共享的 COLAB 工程
索引
- 文章整理自 Generating Anime Characters with StyleGAN2
- 翻译/整理/调试 BY Kamakoto
- COLAB
Comments | NOTHING